A Big chunk of Russian green (with a splash of white)
Tamiya 1/35 JSU152
by Alan Roffey

INTRODUCTION
Zveroboy, which means Beast Killer or Animal Killer, is what they called this huge heavily armoured and heavily armed self propelled gun. And it certainly was a beast killer, as it could decimate Panthers and Tigers, but not at any great range. It’s typically Soviet; build them huge and tough, with an enormous gun to smash those filthy Nazis with. I was immediately attracted to it when the Big T released it, and I bought one from Andy in Antics.
CONSTRUCTION
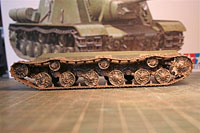
As usual with the ‘T’, construction was very smooth and I don’t want to talk about it, except to say that I ripped off most of the track guards to show off those lovely huge tracks. I also left off the fuel tanks.
PAINT & WEATHER
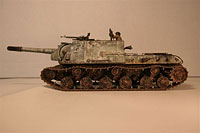
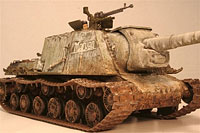
I used White Ensign RLM 71 as a pre shade before applying their Russian Tank Green, which is rather a nice shade. Now straight on to the weathering. Most of the effects you see in the photos are the result of using water colour pencils. In this case Derwent. I simply drew on the various colours where I wanted them and added water with a brush to blend the colours in. I used red oxide (rust), olive green, Payne’s grey, yellow oxide (ochre), and sepia oxide (burnt umber). I did enhance a few areas with thinned Humbrol paints, especially black because I could not find a black water colour pencil.
GLORIOUS MUD
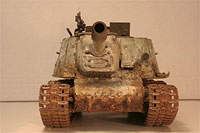
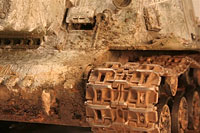
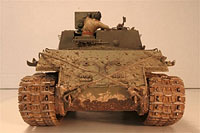
Before this model I'd never really made a serious attempt at textured gunk on the lower hull of a tank. I made my mud from Humbrol enamels, talcum powder, Chinchilla dust from a pet shop, and some cut up stuff that looks a bit like horse hair (scale straw?). I cannot remember where I got it from. Anyway, that part of it didn’t really come through. When my mixture dried it was far too light, so I tried darkening it with Mig productions Wet Affects Damp Earth Texture. In my considered opinion this stuff is underpants. It doesn’t really work and it costs 7 quid for 75 ml.
So, I mixed Mig's Gulf War sand and black smoke pigments to darken the colour, and then put Humbrol gloss varnish on top of this to get my wet mud. Much more effective than the fancy stuff for 7 quid. However, you don't know until you try, do you?
IT'S A WHITEWASH
My original plan was to use the old hair spray technique with Tamiya XF2 white. However, I had a change of heart and decided to use pastel chalk mixed with turps. I painted this mixture on in a haphazard way, let it dry, which didn't take long, and then distressed it with turps, water, toothpicks and emery boards.
I copied some photos, and only whitewashed the vertical surfaces on front and sides of the vehicle; i.e. the surfaces visible to the enemy on the ground. I don't suppose the Red Army had too much to worry about from the Luftwaffe in 1945!
LET'S MAKE TRACKS
Two choices of track in this kit; link and length (or what ever they call it) and 'rubber band' tracks. If it's a vehicle with sag in the tracks, then let’s face it, the rubber band type are rubbish are'’t they? As soon as I got the kit home, these went straight in the bin. In fact, I should have asked Andy in Antics to do this for me! Tamiya make life easy for you, unlike Dragon, by supplying templates for the top runs of 34 links each. This is typical of Tamiya. Without this thoughtful in kit assistance, I would have found it difficult to get a convincing looking sag.
Some of you chaps might now be thinking "this fellow Roffey's a bit of a Tamiya snob". Well, you'd be right. I am. I sprayed the links on the sprues with White Ensign track colour. When they were on the vehicle, I washed them with a brown Mig filter, followed by a heavyish dry brush with Citadel Boltgun metal. I also used this useful acrylic colour to paint the wheel rims, sprocket teeth and guide horns. I like this colour a lot and think it nearly always looks better than using graphite.
WEATHERING CONTINUED
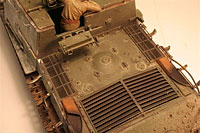
The exhausts were given an oil wash of burnt sienna enhanced with a powdering of Mig pigment light rust, Mig pigment black smoke being used for soot deposits. The same wash I used on the tracks was 'splashed' on lower areas of the upper hull just above the tracks, except any areas that still had track guard.
LET'S GET MUDDY AGAIN
I needed some mud spatter on front and rear of hull, and this time tried a different mix; black smoke and Gulf War sand Mig pigments, PVA, bicarb, and water. I loaded this muck on a flat stiff brush and spattered it on by blowing my airbrush across it. I'd read about this method of application several times in Modelling Mags, but this was the first time I'd tried it. I was pleased with the texture the bicarb gave and the PVA made it stick well. However, maybe I've overdone it just a tad on the rear! One learns from trying different methods though, and I think this mix gives a better look than that I used on the lower hull.
SUPPLEMENTARY ARMAMENT
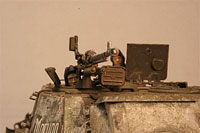
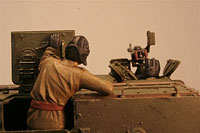
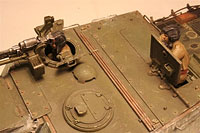
The Dushka 12.7 mm; is this a cool looking machine gun or is this a cool looking machine gun? It’s massive and looks better than anything German, and that’s saying something! I painted the mounting and ammo box Humbrol 86 and washed it with a darker green Alcohol Ink, which I also used on the inside of the hatches. The gun itself received a gunmetal mix, satin varnish on top of that and then a dry brush with Humbrol Metalcoat matt aluminium.
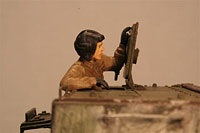
The figures; well, the less said about my painting of faces, the better! I cannot get the eyes right. Any tips anyone? The Commanders eyes look like he's just seen a Konigstiger 200 metres away!
I very much enjoyed the weathering on this vehicle, and I finished the project quite quickly. For me, that means I must have really liked it, hardly breaking away to do other kits.
As always there are things I could have done better; the figures, I forgot to paint the inside under the photo etch grilles black, the join between the upper/lower hull at the front isn't brilliant, and I need to work on the mud mix for next time. Apart from that, I`m quite pleased with it. 8 out of 10?
